1開啟 wemos的伺服器模式
2.透過瀏覽器來控制 wemos的led燈
二、接線圖
led燈正極接在D5,負極接GND
三、程式碼
/*
    This sketch demonstrates how to set up a simple HTTP-like server.
    The server will set a GPIO pin depending on the request
      http://server_ip/gpio/0 will set the GPIO2 low,
      http://server_ip/gpio/1 will set the GPIO2 high
    server_ip is the IP address of the ESP8266 module, will be
    printed to Serial when the module is connected.
*/

#include <ESP8266WiFi.h>

#ifndef STASSID
#define STASSID "your-ssid"
#define STAPSK  "your-password"
#endif

const char* ssid = STASSID;
const char* password = STAPSK;

// Create an instance of the server
// specify the port to listen on as an argument
WiFiServer server(80);

void setup() {
  Serial.begin(115200);

  // prepare LED
  pinMode(LED_BUILTIN, OUTPUT);
  digitalWrite(LED_BUILTIN, 0);

  // Connect to WiFi network
  Serial.println();
  Serial.println();
  Serial.print(F("Connecting to "));
  Serial.println(ssid);

  WiFi.mode(WIFI_STA);
  WiFi.begin(ssid, password);

  while (WiFi.status() != WL_CONNECTED) {
    delay(500);
    Serial.print(F("."));
  }
  Serial.println();
  Serial.println(F("WiFi connected"));

  // Start the server
  server.begin();
  Serial.println(F("Server started"));

  // Print the IP address
  Serial.println(WiFi.localIP());
}

void loop() {
  // Check if a client has connected
  WiFiClient client = server.available();
  if (!client) {
    return;
  }
  Serial.println(F("new client"));

  client.setTimeout(5000); // default is 1000

  // Read the first line of the request
  String req = client.readStringUntil('\r');
  Serial.println(F("request: "));
  Serial.println(req);

  // Match the request
  int val;
  if (req.indexOf(F("/gpio/0")) != -1) {
    val = 0;
  } else if (req.indexOf(F("/gpio/1")) != -1) {
    val = 1;
  } else {
    Serial.println(F("invalid request"));
    val = digitalRead(LED_BUILTIN);
  }

  // Set LED according to the request
  digitalWrite(LED_BUILTIN, val);

  // read/ignore the rest of the request
  // do not client.flush(): it is for output only, see below
  while (client.available()) {
    // byte by byte is not very efficient
    client.read();
  }

  // Send the response to the client
  // it is OK for multiple small client.print/write,
  // because nagle algorithm will group them into one single packet
  client.print(F("HTTP/1.1 200 OK\r\nContent-Type: text/html\r\n\r\n<!DOCTYPE HTML>\r\n<html>\r\nGPIO is now "));
  client.print((val) ? F("high") : F("low"));
  client.print(F("<br><br>Click <a href='http://"));
  client.print(WiFi.localIP());
  client.print(F("/gpio/1'>here</a> to switch LED GPIO on, or <a href='http://"));
  client.print(WiFi.localIP());
  client.print(F("/gpio/0'>here</a> to switch LED GPIO off.</html>"));

  // The client will actually be *flushed* then disconnected
  // when the function returns and 'client' object is destroyed (out-of-scope)
  // flush = ensure written data are received by the other side
  Serial.println(F("Disconnecting from client"));
}
2.並修改如下
const char* ssid = "xxxx";////WeMos要連上的基地台 ssid
const char* password = "xxxxxx"; //基地台密碼
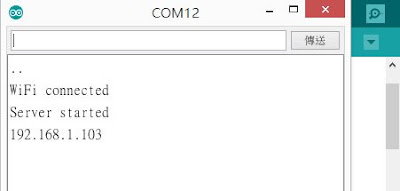
3.點選序列埠螢幕(serial monitor)可以看到以下畫面 server已經啟動,且ip為192.168.1.103(每一台分到ip是不一樣的。
4.打開瀏覽器,網址部份打入:
http://192.168.1.103/LED=ON,出現如下的畫面,燈變亮
http://192.168.1.103/gpio/LED=OFF ,出現如下的畫面,燈變暗


沒有留言:
張貼留言